vMix broadcaster is a professional application that allows its users to add several input sources and switch between them while streaming. Users can add videos, images, pdf presentations and of course their webcams.
In this page we exemplify how you can broadcast using vMix on your channels.
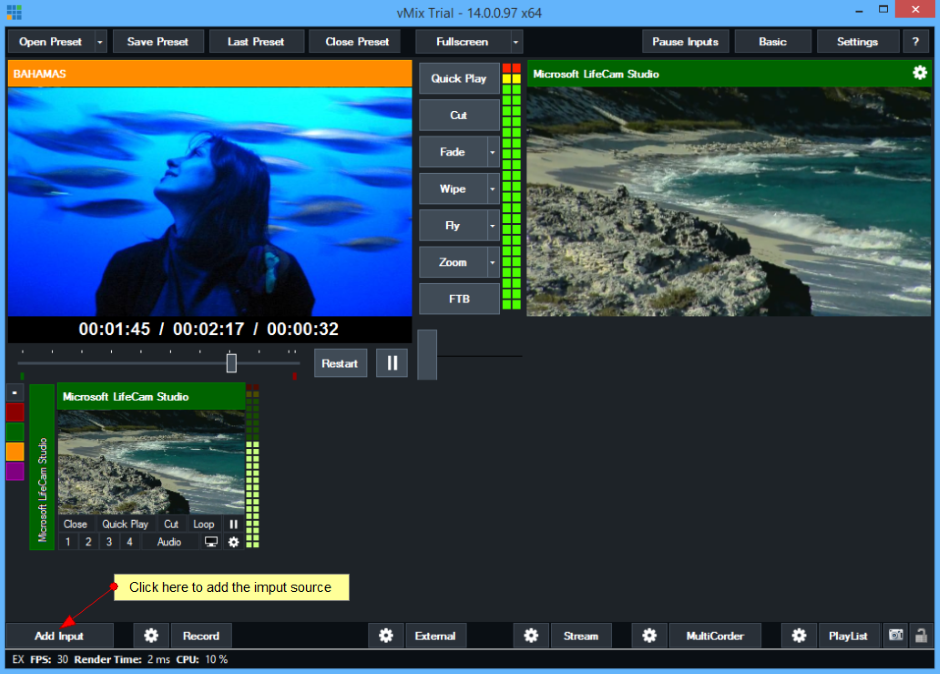
Open the vMix application and select the input source, by clicking on Add Input button:
The input select window will open and you can configure your camera settings:

1. Click on Camera button to configure the camera settings.
2. Select from the drop-down menu your camera source.
3. Select from the drop-down menu the input for your camera. We recommend leaving it to default.
4. Select from the drop-down menu the desired resolution.
5. Select from the drop-down menu the desired frame-rate.
6. Check this box the enable the Interlaced option – to make the video stream clearer.
7. Select from the drop-down menu the video format. The video format depends on each video source.
8. Select from the drop-down menu the audio source.
9. Select from the drop-down menu the audio input.
10. Select from the drop-down menu the audio format.
11. Click OK button when you finish configuring the settings.
12. Click Cancel button to cancel adjusting the camera options.
After you have configured your camera you can adjust the streaming settings:

The Streaming Settings window will open as exemplified in the following picture:
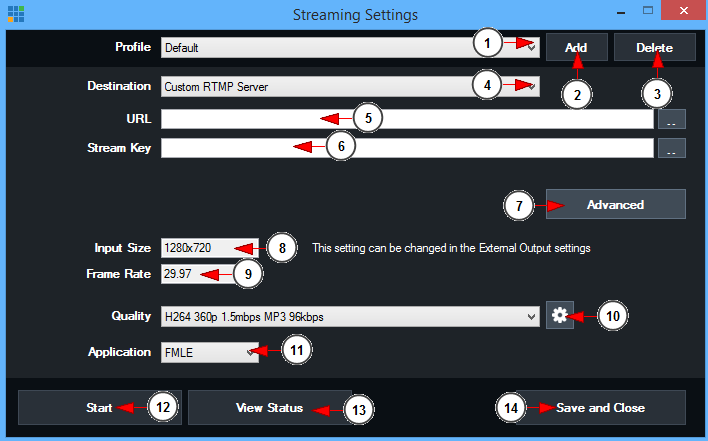
1. Select from the drop-down menu the desired profile.
2. Click here to add a new profile.
3. Click here to delete the existing profile.
4. Select from the drop-down menu the destination: Custom RTMP server.
5. Insert here the streaming URL from Broadcast Settings page.
6. Insert here the streaming key.
7. Click here to open advanced settings window.
8. Insert in this field the desired input size.
9. Insert in this field the desired streaming frame-rate.
10. Select from the drop-down menu the streaming resolution.
11. Select from the drop-down menu FMLE application.
12. Click here to start streaming on your channel.
13. Click here to view the streaming status.
14. Click here to save and closed the streaming settings window.
Important: If you have issues on configuring the video and audio input on vMix, please see the recommendations that we can give you base don our testing experience:
1. From Add Input —> More I have selected “Camera” and enabled the camera. Very important on this step: make sure that on this particular section, Audio device is set to NONE –
2. Clicked again on Add Input –> More and selected “Audio input” section